(→Steps) Tag: Visual edit |
Tag: Visual edit |
||
| (4 intermediate revisions by the same user not shown) | |||
| Line 1: | Line 1: | ||
{{CaseNav}} |
{{CaseNav}} |
||
| + | {{CaseInfobox |
||
| − | {{New}} |
||
| + | |image = FarioC6.jpg |
||
| − | {{CaseInfobox|image =FarioC6.jpg |season = 1|city = [[Fario]]|district = Money Heaven|casenumber = 7|datereleased = 10 August 2018|partner = [[Lena Hopper]]|preceededby = [[Even Dead Cause Troubles]]|succeededby = [[Botox Can Kill]]}} |
||
| + | |season = 1 |
||
| ⚫ | |||
| + | |city = [[Fario]] |
||
| + | |district = Money Heaven |
||
| + | |casenumber = 7 |
||
| + | |datereleased = 10 August 2018 |
||
| + | |partner = [[Lena Hopper]] |
||
| + | |preceededby = [[Even Dead Cause Troubles]]<br /><small>(in [[:Category:Church Valley|Church Valley]])</small> |
||
| + | |succeededby = [[Botox Can Kill]] |
||
| + | }} |
||
| ⚫ | |||
| − | == |
+ | ==Plot== |
| − | During |
+ | During patrolling, an unnamed beat cop approached the team and said that there was a robbery. The team then rushed to the bank and found the body of bank clerk [[Samuel Day]]. The killer also took 100 000$. There was a crowbar next to his body, which (per [[Andre Jovich|Andre]]) was the murder weapon. The team then locked up bank CEO [[Derek Jones]] because he refused to tell who the killer was. |
| − | After |
+ | After autopsying, Andre told the player and Lena that the killer's height was 6'3" based on his calculations. Shortly after, the killer broke into the victim's house. Later, the team found out that Samuel wanted to fire [[Dustin Moore]] because he exposed him. |
| − | + | After gaining enough evidence, the team arrested Dustin Moore for Samuel's murder and for the robbery. On the trial, Dustin said that Samuel would just be another mistake in the system and another broken businessman without Dustin's help. |
|
| + | Later, [[Irving Bennett|Chief Irving]] informed the team that fashion model and Lena's sister [[Marzia Hopper]] would come the next day. |
||
| − | == Summary == |
||
| − | == |
+ | ==Summary== |
| + | ===Victim=== |
||
| − | * |
+ | *'''[[Samuel Day]]''' (killed during the bank robbery) |
| − | === |
+ | ===Murder Weapon=== |
| − | * |
+ | *'''Crowbar''' |
| − | === |
+ | ===Killer=== |
| − | * |
+ | *'''[[Dustin Moore]]''' |
| − | == |
+ | ==Suspects== |
| + | [[File:FarioDoubleJC7.png|thumb|230px]] |
||
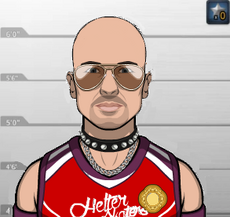
| − | '''<u>[[Double J]]</u>''' |
+ | '''<u>[[Double J]]</u>'''<br />(Rapper) |
| − | |||
| − | (Repper) |
||
{| class="article-table" |
{| class="article-table" |
||
|Height |
|Height |
||
| Line 41: | Line 50: | ||
|Blood |
|Blood |
||
|A+ |
|A+ |
||
| + | |} |
||
| − | |}'''Appearence: ''' |
||
| + | '''Profile: ''' |
||
| − | * Suspect is bald. |
||
| + | *None |
||
| − | * Suspect wear glasses. |
||
| − | * Suspect wear gold brooch. |
||
| − | |||
| ⚫ | |||
| − | |||
| − | (Bank CEO) |
||
| + | [[File:FarioDJonesC7.png|thumb|230px]] |
||
| ⚫ | |||
{| class="article-table" |
{| class="article-table" |
||
|Height |
|Height |
||
| Line 65: | Line 71: | ||
|Blood |
|Blood |
||
|A+ |
|A+ |
||
| + | |} |
||
| − | |}'''Appearence: ''' |
||
| + | '''Profile: ''' |
||
| − | * Suspect have blue paint on face. |
||
| + | *None |
||
| − | * Suspet is bald. |
||
| − | * Suspect wear glasses. |
||
| − | |||
| ⚫ | |||
| − | |||
| − | (Victim's assistant) |
||
| + | [[File:FarioSGibbsC7.png|thumb|230px]] |
||
| ⚫ | |||
{| class="article-table" |
{| class="article-table" |
||
|Height |
|Height |
||
| Line 82: | Line 85: | ||
|- |
|- |
||
|Weight |
|Weight |
||
| − | | |
+ | |145 lbs |
|- |
|- |
||
|Eyes |
|Eyes |
||
| Line 89: | Line 92: | ||
|Blood |
|Blood |
||
|A+ |
|A+ |
||
| + | |} |
||
| − | |}'''Appearence: ''' |
||
| + | '''Profile: ''' |
||
| − | * Suspet have blue pant on face. |
||
| + | *None |
||
| − | * Suspect wear glasses. |
||
| − | * Suspect wear gold brooch. |
||
| − | |||
| ⚫ | |||
| − | |||
| − | (Victim's wife) |
||
| + | [[File:FarioDDayC7.png|thumb|230px]] |
||
| ⚫ | |||
{| class="article-table" |
{| class="article-table" |
||
|Height |
|Height |
||
| Line 113: | Line 113: | ||
|Blood |
|Blood |
||
|B+ |
|B+ |
||
| + | |} |
||
| − | |}'''Appearence: ''' |
||
| + | '''Profile: ''' |
||
| − | * Suspect wear glasses. |
||
| + | *None |
||
| − | * Suspect have blue paint on face. |
||
| − | |||
| ⚫ | |||
| − | |||
| − | (advertising manager) |
||
| + | [[File:FarioDMooreC7.png|thumb|230px]] |
||
| ⚫ | |||
{| class="article-table" |
{| class="article-table" |
||
|Height |
|Height |
||
| Line 136: | Line 134: | ||
|Blood |
|Blood |
||
|A+ |
|A+ |
||
| + | |} |
||
| − | |}'''Appearence: ''' |
||
| + | '''Profile: ''' |
||
| − | * Suspect have blue paint on face. |
||
| + | *None |
||
| − | * Suspet is bald. |
||
| − | * Suspect wear glasses. |
||
| − | * Suspet wear gold brooch. |
||
| − | |||
| ⚫ | |||
| ⚫ | |||
| ⚫ | |||
| − | (Lena's girlfriend) |
||
| + | [[File:FarioMLovatoC4.png|thumb|230px]] |
||
| ⚫ | |||
{| class="article-table" |
{| class="article-table" |
||
|Height |
|Height |
||
| Line 162: | Line 157: | ||
|O+ |
|O+ |
||
|} |
|} |
||
| − | '''<u>[[Diego Diaz]]</u>''' |
||
| − | (Lead Inspector) |
+ | '''<u>[[Diego Diaz]]</u>'''<br />(Lead Inspector) |
{| class="article-table" |
{| class="article-table" |
||
|Height |
|Height |
||
| Line 182: | Line 176: | ||
|} |
|} |
||
| − | == |
+ | ==Killer's Profile== |
| − | * |
+ | *The killer has blue paint on the face. |
| − | * |
+ | *The killer is 6'3". |
| − | * |
+ | *The killer is bald. |
| − | * |
+ | *The killer wears glasses. |
| − | * |
+ | *The killer wears a gold brooch. |
[[File:Killer profileDD 7.png|centre|thumb|503x503px]] |
[[File:Killer profileDD 7.png|centre|thumb|503x503px]] |
||
| − | == |
+ | ==Crime Scenes== |
{| class="article-table" border="1" cellpadding="1" cellspacing="1" style="margin: 0px auto; height: 400px; width: 450px;" |
{| class="article-table" border="1" cellpadding="1" cellspacing="1" style="margin: 0px auto; height: 400px; width: 450px;" |
||
| style="text-align: center;" |'''Bank''' |
| style="text-align: center;" |'''Bank''' |
||
| Line 200: | Line 194: | ||
| style="text-align: center;" |'''Watson Street Bonus''' |
| style="text-align: center;" |'''Watson Street Bonus''' |
||
|- |
|- |
||
| − | | style="text-align: center;" |''' |
+ | | style="text-align: center;" |'''Victim's House''' |
| style="text-align: center;" |'''Sofa''' |
| style="text-align: center;" |'''Sofa''' |
||
| − | | style="text-align: center;" |''' |
+ | | style="text-align: center;" |'''Victim's House Bonus''' |
|} |
|} |
||
| − | == Steps == |
||
| − | == |
+ | ==Steps== |
| + | ===Chapter 1=== |
||
* Investigate Bank (Clues: Victim's body, paint bomb, crowbar, coat of arms; Victim indentificated: Samuel Day) |
* Investigate Bank (Clues: Victim's body, paint bomb, crowbar, coat of arms; Victim indentificated: Samuel Day) |
||
* Autopsy Victim's body (18:00:00; Attribute: Killer is 6.3 Feet tall) |
* Autopsy Victim's body (18:00:00; Attribute: Killer is 6.3 Feet tall) |
||
| Line 222: | Line 216: | ||
* Move to next chapter (2 stars) |
* Move to next chapter (2 stars) |
||
| − | === |
+ | ===Chapter 2=== |
* Investigate Victim's House (Clues: broken handle, Victim's laptop, box of chocolate; New Suspect: Dinnah Day) |
* Investigate Victim's House (Clues: broken handle, Victim's laptop, box of chocolate; New Suspect: Dinnah Day) |
||
* Inform Dinnah that her husband is dead (Dustin Moore: Victim's house searched) |
* Inform Dinnah that her husband is dead (Dustin Moore: Victim's house searched) |
||
| Line 242: | Line 236: | ||
* Move to next chapter (0 stars) |
* Move to next chapter (0 stars) |
||
| − | === |
+ | ===Chapter 3=== |
* Investigate Sofa (Clues: locked metal box) |
* Investigate Sofa (Clues: locked metal box) |
||
* Examine locked metal box (Result: pictures) |
* Examine locked metal box (Result: pictures) |
||
| Line 253: | Line 247: | ||
* Analyze blue substance (12:00:00; Attribute:Killer wear glasses) |
* Analyze blue substance (12:00:00; Attribute:Killer wear glasses) |
||
* Analyze gold dust (12:00:00; Attribute: Killer wear gold brooch) |
* Analyze gold dust (12:00:00; Attribute: Killer wear gold brooch) |
||
| − | * Ask Derek about a bill (Prerequisite: Counter investigated) |
+ | * Ask Derek about a bill (Prerequisite: Counter investigated) |
* Ask Dinnah about a fight (Prerequisite: camera resored) |
* Ask Dinnah about a fight (Prerequisite: camera resored) |
||
* Arrest the killer! |
* Arrest the killer! |
||
* Move to Money Is Not Everything 1/5 (1 star) |
* Move to Money Is Not Everything 1/5 (1 star) |
||
| − | === |
+ | ===Money Is Not Everything (1/5)=== |
* See what Monica want |
* See what Monica want |
||
* Investigate Bank (Clues: wallet) |
* Investigate Bank (Clues: wallet) |
||
Latest revision as of 17:25, 20 August 2018
| Money of Blood | |
|---|---|

| |
| Information | |
| Season | 1 |
| City | Fario |
| District | Money Heaven |
| Case Number | 7 |
| Date of Release | 10 August 2018 |
| Partner(s) | Lena Hopper |
| Progression | |
| Preceded by | Succeeded by |
| Even Dead Cause Troubles (in Church Valley) |
Botox Can Kill |
Money of Blood is a case featured in Season 1 of Criminal Case, appearing as the seventh case of the game. It is the first one to take place in the Money Heaven, a district based in Fario.
Plot
During patrolling, an unnamed beat cop approached the team and said that there was a robbery. The team then rushed to the bank and found the body of bank clerk Samuel Day. The killer also took 100 000$. There was a crowbar next to his body, which (per Andre) was the murder weapon. The team then locked up bank CEO Derek Jones because he refused to tell who the killer was.
After autopsying, Andre told the player and Lena that the killer's height was 6'3" based on his calculations. Shortly after, the killer broke into the victim's house. Later, the team found out that Samuel wanted to fire Dustin Moore because he exposed him.
After gaining enough evidence, the team arrested Dustin Moore for Samuel's murder and for the robbery. On the trial, Dustin said that Samuel would just be another mistake in the system and another broken businessman without Dustin's help.
Later, Chief Irving informed the team that fashion model and Lena's sister Marzia Hopper would come the next day.
Summary
Victim
- Samuel Day (killed during the bank robbery)
Murder Weapon
- Crowbar
Killer
Suspects

Double J
(Rapper)
| Height | 6'3" |
| Age | 44 |
| Weight | 180 lbs |
| Eyes | Brown |
| Blood | A+ |
Profile:
- None


Derek Jones
(Bank CEO)
| Height | 6'3" |
| Age | 61 |
| Weight | 194 lbs |
| Eyes | Brown |
| Blood | A+ |
Profile:
- None


Stella Gibbs
(Victim's Assistant)
| Height | 5'6" |
| Age | 22 |
| Weight | 145 lbs |
| Eyes | Green |
| Blood | A+ |
Profile:
- None

Dinnah Day
(Victim's Wife)
| Height | 5'8" |
| Age | 28 |
| Weight | 148 lbs |
| Eyes | Blue |
| Blood | B+ |
Profile:
- None


Dustin Moore
(Advertising Manager)
| Height | 6'3" |
| Age | 26 |
| Weight | 184 lbs |
| Eyes | Brown |
| Blood | A+ |
Profile:
- None
Quasi-Suspect(s)


Monica Lovato
(Lena's Girlfriend)
| Height | 5'8" |
| Age | 25 |
| Weight | 140 lbs |
| Eyes | Brown |
| Blood | O+ |
Diego Diaz
(Lead Inspector)
| Height | 6'6" |
| Age | 28 |
| Weight | 173 lbs |
| Eyes | Green |
| Blood | O+ |
Killer's Profile
- The killer has blue paint on the face.
- The killer is 6'3".
- The killer is bald.
- The killer wears glasses.
- The killer wears a gold brooch.


Crime Scenes
| Bank | Counter | Bank Bonus |
| Watson Street | Sidewalk | Watson Street Bonus |
| Victim's House | Sofa | Victim's House Bonus |
Steps
Chapter 1
- Investigate Bank (Clues: Victim's body, paint bomb, crowbar, coat of arms; Victim indentificated: Samuel Day)
- Autopsy Victim's body (18:00:00; Attribute: Killer is 6.3 Feet tall)
- Examine paint bomb (Result: Blue paint)
- Examine coat of arms (Result: Double J amblem; New Suspect: Double J)
- Analyze crowbar (12:00:00; Murder weapon classificated: Crowbar)
- Analyze blue paint (06:00:00; Attribute: Killer have blue face paint)
- Talk to Double J how his amblem get to the Crime Scene (Prerequisite: Coat of Arms indentificated; New Crime Scene: Wotson Street)
- Investigate Wotson Street (Prerequisite: Double J interrogated; Clues: broken HDD, Cryptex)
- Examine Broken HDD (Result: HDD)
- Examine Cryptex (Result cheque; New Suspect: Derek Jones)
- Analyze HDD (03:00:00; New Suspect: Stella Gibbs)
- Ask Derek about a check (Prerequisite: Cryptex unlocked)
- See what ties Stella had with the victim (Prerequisite: Hard Disc Drive analyzed)
- Move to next chapter (2 stars)
Chapter 2
- Investigate Victim's House (Clues: broken handle, Victim's laptop, box of chocolate; New Suspect: Dinnah Day)
- Inform Dinnah that her husband is dead (Dustin Moore: Victim's house searched)
- Examine broken handle (Result: Handle)
- Examine Victim's laptop (Unlocked laptop)
- Examine box of chocolate (Result: Readable tag)
- Analyze handle (06:00:00; New Crime Scene: Sidewalk)
- Analyze Victim's laptop (06:00:00; New Suspect: Dustin Moore)
- Ask Stella about the tag (Prerequisite: tag is readable again)
- Question Dustin about threats (Prerequisite: Laptop analyzed)
- Investigate Sidewalk (Prerequisite: handle analyzed; Clues: ski mask, picture, ring)
- Examine ski mask (Result: Strange substance)
- Examine picture (Result: Picture of Samuel and Double J)
- Examine ring (Result: Ring serial number)
- Analyze strange substance (08:00:00; Attribute: Killer is bald)
- Analyze Ring serial number (10:00:00)
- Ask Double J about a picture (Prerequisite: Picture examined)
- Give ring back to Dinnah (Prerequisite: Ring analyzed)
- Move to next chapter (0 stars)
Chapter 3
- Investigate Sofa (Clues: locked metal box)
- Examine locked metal box (Result: pictures)
- Examine pictures (Result: Stella's picture)
- Ask Stella if she knew for that picture (Prerequisite: Pictures examined; New Crime scene: ounter)
- Investigate Counter (Clues: napkin, broken camera, bill, victim's name badge)
- Examine napkin (Result: Blue substance)
- Examine broken camera (Result Camera)
- Examine victims name badge (Result: Gold dust)
- Analyze blue substance (12:00:00; Attribute:Killer wear glasses)
- Analyze gold dust (12:00:00; Attribute: Killer wear gold brooch)
- Ask Derek about a bill (Prerequisite: Counter investigated)
- Ask Dinnah about a fight (Prerequisite: camera resored)
- Arrest the killer!
- Move to Money Is Not Everything 1/5 (1 star)
Money Is Not Everything (1/5)
- See what Monica want
- Investigate Bank (Clues: wallet)
- Examine Wallet (Result: picture)
- Give back Monica's wallet (Prerequisite: Wallet examined; Reward: Burger)
- See what Diego want (Prerequisite: Monica interrogated; Reward: 20 000 coins)
- Investigate Watson Street (Clues: Trash Can)
- Examine Trash Can (Result: Diego's dunglasses)
- Give glasses back to Diego (Prerequisite: Trash can examined; Reward: Stripped shirt)
- Move to next case (0 stars)