No edit summary Tag: Visual edit |
No edit summary |
||
| (38 intermediate revisions by 2 users not shown) | |||
| Line 1: | Line 1: | ||
| + | {{AlphaBay/Nav}} |
||
| − | {{CaseInfobox|season = 1|city = Alpha Bay|district = Street Valley|casenumber = 2|datereleased = |
+ | {{AlphaBay/CaseInfobox|name = Classic Murder|image = 1551824005835.png|season = 1|city = [[Alpha Bay]]|district = [[:Category:Street Valley|Street Valley]]|casenumber = 2|datereleased = 2nd December 2018|partner = [[Susan Parker]]|preceededby = [[Struck with Lightning]]|succeededby = [[Does Hypnotism Even Exist?]]}} |
| − | '''Classic Murder''' is a case featured in |
+ | '''Classic Murder''' is a [[:Category:Cases (Alpha Bay)|case]] featured in [[User:Ranger_Habib|Criminal Case]], appearing as the second case as well as the city of [[Alpha Bay]], and the second one to take place in the [[:Category:Street Valley|Street Valley]] district. |
| − | == |
+ | ==Plot== |
| − | [[Susan Parker|Susan]] wanted to show the player around. After a while when they came near the local diner, the diner owner named [[Monica Storm]] told them that she |
+ | [[Susan Parker|Susan]] wanted to show the player around. After a while when they came near the local diner, the diner owner named [[Monica Storm]] told them that she had seen the defending champion golfer, [[Johnny Howard]] lying dead at the supermarket. Hearing this, the team didn't hesitate to investigate the supermarket and found the victim who was stabbed in his back. |
| − | [[Eva Littlewood|Eva]] told them that the death cause was pretty obvious, he died due to blood loss. She |
+ | [[Eva Littlewood|Eva]] told them that the death cause was pretty obvious, he died due to blood loss. She confirmed that the killer is right-handed by judging the angle of the wound. |
| − | The team interrogated Monica |
+ | The team interrogated Monica who said that Johnny often went to her shop. They also interrogated [[Casey Walter]], the victim's girlfriend who said the victim was pretty upset recently. Then they investigated an abandoned house where the victim used to go frequently which turned out to be [[Richard Stamford]]'s drug supplying HQ, leading him to be a suspect once again. He confessed to provide the victim with drugs and mentioned that the victim had become depressed recently. The victim's opponent of the final match of the previous tou rnament, [[Ricky Tipton]] appeared to be questioned on who's words even death was less for a cheat like the victim. |
| + | {| class="article-table article-table-selected" style="height: 250px; width: 250px; float: right;" cellspacing="1" cellpadding="1" border="1" |
||
| + | |+Ranking |
||
| + | |- |
||
| + | ! scope="row" |Case Name |
||
| + | |<font color="#00730A">8</font>/10 |
||
| + | |- |
||
| + | ! scope="row" |Plot |
||
| + | |<font color="#00730A">8</font>/10 |
||
| + | |- |
||
| + | ! scope="row" |Creativity |
||
| + | |<font color="#00730A">8</font>/10 |
||
| + | |- |
||
| + | ! scope="row" |Effort |
||
| + | |<font color="#00730A">8</font>/10 |
||
| + | |- |
||
| + | ! scope="row" |Overall |
||
| + | |<b><font color="#00730A">8</font></b>/10 |
||
| + | |- |
||
| + | ! scope="row" |Grade |
||
| + | |Excellent (<b><font color="#00730A">A-</font></b>) |
||
| + | |- |
||
| + | ! scope="row" |Afterword |
||
| + | |This was a good case, but like every other case, there's some way to improve. Keep working hard! [[User:CoolCCMystery|CoolCCMystery]] ([[User talk:CoolCCMystery|talk]]) 20:13, February 9th, 2019 (UTC) |
||
| + | |} |
||
| − | The player & Susan then decided to investigate Monica's diner, given how Johnny went there and Monica |
+ | The player & Susan then decided to investigate Monica's diner, given how Johnny went there and Monica herself was a suspect. This worked as they came to know that Johnny gave $50000 to [[Roger Spitfire]]. Roger was immediately interrogated who said the victim gave them the money because they did a work for him. And after they investigated the abandoned house again, they found out that the victim owed nearly $15000 for drugs. The team knew that Richard could kill people for money [[Struck with Lightning|as he did before]], so they didn't hesitate to question him. Richard was furious about the fact and said he wanted to thank who had murdered Johnny. It was also revealed that Johnny wanted to reason with Ricky for the tournament event, but Ricky didn't listen to him and drove him out of his house. |
| − | The team decided to investigate the diner again and found out from Monica that she was angry at the victim |
+ | The team decided to investigate the diner again and found out from Monica that she was angry at the victim for bringing Roger and his gang with him. Even Ricky followed him and would go to the diner. Roger and Ricky never paid their bill which made Monica furious at the victim. Then they went back to the primary crime scene and with the help of a bunch of clues, they successfully incriminated Ricky Tipton for the murder of Johnny Howard. |
| − | Ricky told them that he should be congratulated for killing Johnny as he was a cheater. Susan asked him how did |
+ | Ricky told them that he should be congratulated for killing Johnny as he was a cheater. Susan asked him how did Johnny cheat and Ricky replied that in order to win the match without any problem, Johnny put drugs in Ricky's bag and he told the authority that Ricky won the previous matches by cheating. After that the authority didn't even think twice and disqualified Ricky and declared Johnny as the champion of the tournament when Ricky deserved to win the trophy as a better player than Johnny. That event made Ricky angry enough to kill Johnny, even he followed Johnny everywhere. Johnny became depressed after that event and wanted to atone for that. So, he asked Ricky to meet him at the supermarket even after getting driven by Ricky from his house, giving him an ultimate chance to kill Johnny. Ricky was so angry that he stabbed Johnny, even after he apologized. For the first-degree murder, [[Judith Powell|Judge Powell]] sentenced him to 30 years in prison with a chance for parole in 20 years. |
| − | After arresting Ricky, Casey asked them to find out why Johnny cheated in the final match. They came to know that Roger and his gang was behind all those |
+ | After arresting Ricky, Casey asked them to find out why Johnny cheated in the final match. They came to know that Roger and his gang was behind all those amd that they made a deal only to get the money from the victim. After fining Roger and giving the news to Casey, they investigated the diner as people were complaining that Monica was serving unhygienic food. But after a quick analysis, it was revealed the food was fully safe and hygienic. Then Monica offered them a special burger as a thanks. |
| − | == |
+ | ==Summery== |
| + | ===[[:Category:Victims (Alpha Bay)|Victim]]=== |
||
| − | === Victim === |
||
* '''Johnny Howard ''' (Found stabbed in his back) |
* '''Johnny Howard ''' (Found stabbed in his back) |
||
| − | === Murder Weapon |
+ | ===[[:Category:Murder Weapons (Romanov)|Murder Weapon]]=== |
* '''Pocket Knife''' |
* '''Pocket Knife''' |
||
| + | ===[[:Category:Killers (Alpha Bay)|Killer]]=== |
||
| − | === Killer === |
||
* '''Ricky Tipton''' |
* '''Ricky Tipton''' |
||
| − | == |
+ | ==[[:Category:Suspects (Alpha Bay)|Suspects]]== |
| − | <gallery> |
+ | <gallery position="center"> |
| − | + | MonicaC2.jpg|[[Monica Storm]] |
|
| − | + | CaseyC2.jpg|[[Casey Walter]] |
|
| − | + | RichardC2.png|[[Richard Stamford]] |
|
| − | + | RickyC2.png|[[Ricky Tipton]] |
|
| − | + | SpitfireC2.jpg|[[Roger Spitfire]] |
|
</gallery> |
</gallery> |
||
| − | == |
+ | ==[[:Category:Killer's Profile (Romanov)|Killer's Profile]]== |
* The killer is right-handed. |
* The killer is right-handed. |
||
* The killer drinks Bloody Mary. |
* The killer drinks Bloody Mary. |
||
* The killer uses Friendnet. |
* The killer uses Friendnet. |
||
| − | * The killer's |
+ | * The killer's weighs 147 lbs. |
* The killer's blood type is B+. |
* The killer's blood type is B+. |
||
| − | [[File: |
+ | [[File:1551826330379.png|center|thumb|608px]] |
| − | == |
+ | ==Crime Scenes== |
{| class="article-table" border="1" cellpadding="1" cellspacing="1" style="margin: 0px auto; height: 400px; width: 450px;" |
{| class="article-table" border="1" cellpadding="1" cellspacing="1" style="margin: 0px auto; height: 400px; width: 450px;" |
||
| − | | style="text-align: center;" |'''Supermarket |
+ | | style="text-align: center;" |'''Supermarket''' |
| − | | style="text-align: center;" |'''Drink Corner |
+ | | style="text-align: center;" |'''Drink Corner''' |
| style="text-align: center;" |'''Supermarket Bonus''' |
| style="text-align: center;" |'''Supermarket Bonus''' |
||
|- |
|- |
||
| − | | style="text-align: center;" |'''Abandoned House |
+ | | style="text-align: center;" |'''Abandoned House''' |
| − | | style="text-align: center;" |''' |
+ | | style="text-align: center;" |'''Lawm''' |
| style="text-align: center;" |'''Abandoned House Bonus''' |
| style="text-align: center;" |'''Abandoned House Bonus''' |
||
|- |
|- |
||
| − | | style="text-align: center;" |'''Diner |
+ | | style="text-align: center;" |'''Diner''' |
| − | | style="text-align: center;" |'''Kitchen |
+ | | style="text-align: center;" |'''Kitchen''' |
| − | | style="text-align: center;" |'''Diner Bonus |
+ | | style="text-align: center;" |'''Diner Bonus''' |
|} |
|} |
||
| − | == |
+ | ==Steps== |
| − | === |
+ | ===Chapter 1=== |
| − | * Investigate Supermarket. (Clues: Victim's Body, |
+ | * Investigate Supermarket. (Clues: Victim's Body, Sports Bag, Cigarette Pack, Stained Can; Victim identified: Johnny Howard; New Suspect: Monica Storm) |
| − | * Autopsy Victim's Body. (18:00:00; Attribute: The |
+ | * Autopsy Victim's Body. (18:00:00; Attribute: The killer is right-handed) |
| − | * Ask Monica about the victim. |
+ | * Ask Monica about the victim. |
| + | * Examine Sports Bag. (Result: Torn Photo) |
||
| ⚫ | |||
| + | * Restore Torn Photo. (Result: Victim's Photo; New Clue: Unknown Woman) |
||
| ⚫ | |||
| + | * Identify Unknown Woman. (Result: Casey Walter; New Suspect: Casey Walter) |
||
| ⚫ | |||
| ⚫ | |||
| + | * Examine Stained Can. (Result: Dark Red Substance) |
||
| + | * Analyze Dark Red Substance. (06:00:00; Attribute: The killer drinks Bloody Mary) |
||
| ⚫ | |||
| ⚫ | |||
* Examine Drug Baggie. (Result: Supplier Code; New Suspect: Richard Stamford) |
* Examine Drug Baggie. (Result: Supplier Code; New Suspect: Richard Stamford) |
||
| − | * Ask Richard |
+ | * Ask Richard Stamford if he supplied drugs to the victim. (Prerequisite: Drug Baggie examined) |
| − | * Examine |
+ | * Examine Golf Club. (Result: Sweat) |
| + | * Analyze Sweat. (06:00:00; New Suspect: Ricky Tipton) |
||
| − | * Ask Ricky |
+ | * Ask Ricky Tipton about the victim. Prerequisite: Sweat analyzed) |
| − | * Go to Chapter 2. (1 |
+ | * Go to Chapter 2. (1 star) |
| − | === |
+ | ===Chapter 2=== |
| − | * Investigate Diner. (Clues: Wallet |
+ | * Investigate Diner. (Clues: Wallet, Smartphone; Available after unlocking Chapter 2) |
| − | * Examine Wallet. (Result: Bank account check) |
+ | * Examine Wallet. (Result: Bank account check) |
| − | * Examine Check. (Result: Bank account number) |
+ | * Examine Check. (Result: Bank account number) |
| − | * Analyze Bank account number. (06:00:00; Result: Roger's account[ |
+ | * Analyze Bank account number. (06:00:00; Result: Roger's account [A huge amount of money got transferred from Johnny's account to his account]; New Suspect: Roger Spitfire) |
| − | * Ask Roger why the victim gave him money. (Profile |
+ | * Ask Roger why the victim gave him money. (Profile updated: Roger is right-handed) |
| − | * |
+ | * Unlock Smartphone. (Result: Unlocked Smartphone) |
| − | * Analyze |
+ | * Analyze Smartphone. (06:00:00; Result: Victim's phone [His Friendnet account was found full of death threats]; Attribute: The killer uses Friendnet) |
| ⚫ | |||
| − | * Unlock Smartphone. (Result: Unlocked Smartphone) |
||
| + | * Examine Richard's Diary. (Result: Information about Richard's drug supplying occupation) |
||
| − | * Analyze Smartphone. (06:00:00; Result: Victim's phone[his Friendnet account was found full of death threats]; Attribute: The killer uses Friendnet) |
||
| ⚫ | |||
| ⚫ | |||
| − | * |
+ | * Unlock Locked Laptop. (Result: Victim's Laptop) |
| ⚫ | |||
| ⚫ | |||
| ⚫ | |||
| − | * Unlock Locked Laptop. (Result: Victim's Laptop) |
||
| ⚫ | |||
| ⚫ | |||
| ⚫ | |||
| ⚫ | |||
| − | === |
+ | ===Chapter 3=== |
| − | * Investigate Kitchen. (Clues: Bloody Mary Glass, Broken Signboard; |
+ | * Investigate Kitchen. (Clues: Bloody Mary Glass, Broken Signboard; Available after unlocking Chapter 3) |
* Examine Bloody Mary Glass. (Result: Bloody Mary Sample) |
* Examine Bloody Mary Glass. (Result: Bloody Mary Sample) |
||
| − | * Analyze Bloody Mary Sample. (06:00:00; Result: DNA Sample of Casey; Profile |
+ | * Analyze Bloody Mary Sample. (06:00:00; Result: DNA Sample of Casey; Profile updated: Casey drinks Bloody Mary) |
| − | * Ask Casey what she was doing at the kitchen. ( |
+ | * Ask Casey what she was doing at the kitchen. (Profiles updated: Casey is right-handed, Monica drinks Bloody Mary) |
| − | * Restore Broken Signboard. (Result: Signboard[The victim was banned from the diner]) |
+ | * Restore Broken Signboard. (Result: Signboard [The victim was banned from the diner]) |
| − | * Ask Monica why she banned the victim from her diner. (Profile |
+ | * Ask Monica why she banned the victim from her diner. (Profile updated: Monica is right-handed & uses Friendnet) |
| − | * Ask Roger why he used to go to diner with the victim. (Profile |
+ | * Ask Roger why he used to go to diner with the victim. (Profile updated: Ricky drinks Bloody Mary; Prerequisite: Monica interrogated) |
| − | * Investigate Drink Corner. (Clues: Bloody Mary Can, Trash Can) |
+ | * Investigate Drink Corner. (Clues: Bloody Mary Can, Trash Can; Prerequisite: All tasks before must be done first) |
| − | * Examine Bloody Mary Can. (Result: Note |
+ | * Examine Bloody Mary Can. (Result: Note) |
| − | * Analyze Can. (09:00:00; Attribute: The killer's |
+ | * Analyze Can. (09:00:00; Attribute: The killer's weighs 147 lbs) |
* Examine Trash Can. (Result: Pocket Knife) |
* Examine Trash Can. (Result: Pocket Knife) |
||
| − | * Examine Pocket Knife. (Result: Blood |
+ | * Examine Pocket Knife. (Result: Blood) |
| − | * Analyze Blood |
+ | * Analyze Blood. (15:00:00; Attribute: The killer's blood type is B+; Murder Weapon registered: Pocket Knife) |
| − | * |
+ | * Take care of the killer now! |
| − | * Go to Chaos |
+ | * Go to Chaos in the Streets (2/7). (No stars) |
| − | === |
+ | ===Chaos in the Streets (2/7)=== |
'''[[File:1547141096333.png|500px|borde]]''' |
'''[[File:1547141096333.png|500px|borde]]''' |
||
| − | * Ask Casey what happened. ( |
+ | * Ask Casey what happened. (Available after unlocking Chaos in the Streets) |
| − | * Investigate Supermarket. (Clues: Instruction Paper) |
+ | * Investigate Supermarket. (Clues: Instruction Paper) |
| − | * Examine Instruction Paper. (Result: Instruction[Someone asked Johnny to meet at the abandoned house]) |
+ | * Examine Instruction Paper. (Result: Instruction [Someone asked Johnny to meet at the abandoned house]) |
| − | * Investigate Abandoned House. (Result: Drawer) |
+ | * Investigate Abandoned House. (Result: Drawer) |
| − | * Examine Drawer. (Result: Note[Asking the victim to give money for helping him to win the championship]) |
+ | * Examine Drawer. (Result: Note [Asking the victim to give money for helping him to win the championship]) |
| − | * Quiz Roger why he |
+ | * Quiz Roger why he forced the victim to cheat. (Reward: '''20000 Coins''') |
| − | * Inform Casey about the facts. (Reward: '''Gold Chain''' [MALE], '''Pearl Necklace''' [FEMALE] |
+ | * Inform Casey about the facts. (Reward: '''Gold Chain''' [MALE], '''Pearl Necklace''' [FEMALE]) |
| − | * Ask Monica why |
+ | * Ask Monica why people are complaining about her diner. (Prerequisite: All tasks before must be done first) |
| − | * Investigate Kitchen. (Clues: Cooked Food; Prerequisite: Monica |
+ | * Investigate Kitchen. (Clues: Cooked Food; Prerequisite: Monica interrogated) |
| − | * |
+ | * Analyze Food Sample. (06:00:00; Result: Info [Foods are hygienic & safe]) |
| − | * Anakyze Food Sample. (06:00:00; Result: Info[Foods are hygenic & safe]) |
||
* Inform Monica that there is nothing to worry about. (Reward: '''Burger''') |
* Inform Monica that there is nothing to worry about. (Reward: '''Burger''') |
||
| − | * Move on to a |
+ | * Move on to a [[Does Hypnotism Even Exist?|new crime]]! (No stars) |
| ⚫ | |||
| − | |||
| − | [[Category: |
+ | [[Category: All Fanmade Cases]] |
| − | [[Category: |
+ | [[Category: Street Valley]] |
[[Category: Cases (Alpha Bay)]] |
[[Category: Cases (Alpha Bay)]] |
||
| ⚫ | |||
Revision as of 05:32, 9 August 2020
| ◄ | General | ► |
| Classic Murder | |
|---|---|
| |
| General information | |
| Season | 1 |
| City | Alpha Bay |
| District | Street Valley |
| Case # | 2 |
| Initial release date | 2nd December 2018 |
| Partner(s) | Susan Parker |
| Case chronology | |
| ← Preceded by | Succeeded by → |
| Struck with Lightning | Does Hypnotism Even Exist? |
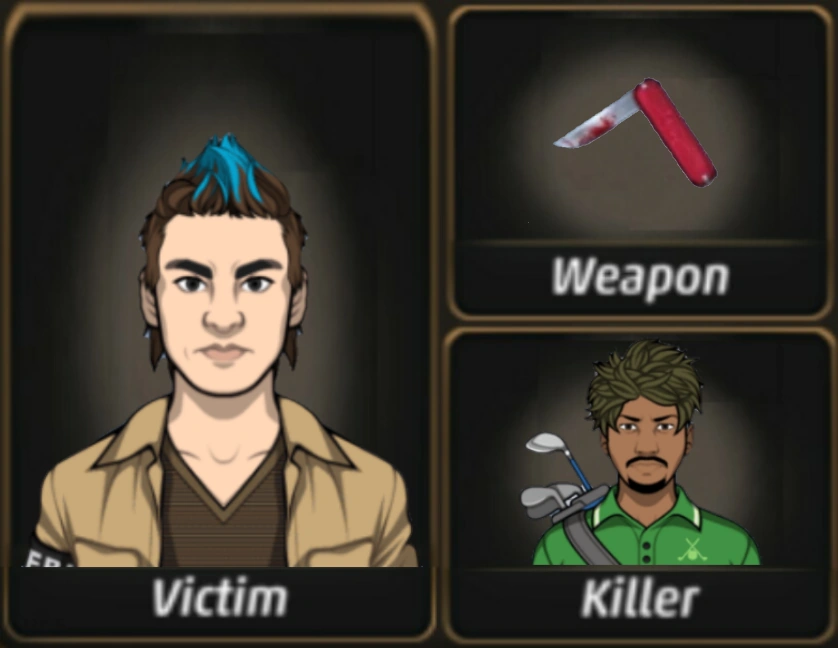
Classic Murder is a case featured in Criminal Case, appearing as the second case as well as the city of Alpha Bay, and the second one to take place in the Street Valley district.
Plot
Susan wanted to show the player around. After a while when they came near the local diner, the diner owner named Monica Storm told them that she had seen the defending champion golfer, Johnny Howard lying dead at the supermarket. Hearing this, the team didn't hesitate to investigate the supermarket and found the victim who was stabbed in his back.
Eva told them that the death cause was pretty obvious, he died due to blood loss. She confirmed that the killer is right-handed by judging the angle of the wound.
The team interrogated Monica who said that Johnny often went to her shop. They also interrogated Casey Walter, the victim's girlfriend who said the victim was pretty upset recently. Then they investigated an abandoned house where the victim used to go frequently which turned out to be Richard Stamford's drug supplying HQ, leading him to be a suspect once again. He confessed to provide the victim with drugs and mentioned that the victim had become depressed recently. The victim's opponent of the final match of the previous tou rnament, Ricky Tipton appeared to be questioned on who's words even death was less for a cheat like the victim.
| Case Name | 8/10 |
|---|---|
| Plot | 8/10 |
| Creativity | 8/10 |
| Effort | 8/10 |
| Overall | 8/10 |
| Grade | Excellent (A-) |
| Afterword | This was a good case, but like every other case, there's some way to improve. Keep working hard! CoolCCMystery (talk) 20:13, February 9th, 2019 (UTC) |
The player & Susan then decided to investigate Monica's diner, given how Johnny went there and Monica herself was a suspect. This worked as they came to know that Johnny gave $50000 to Roger Spitfire. Roger was immediately interrogated who said the victim gave them the money because they did a work for him. And after they investigated the abandoned house again, they found out that the victim owed nearly $15000 for drugs. The team knew that Richard could kill people for money as he did before, so they didn't hesitate to question him. Richard was furious about the fact and said he wanted to thank who had murdered Johnny. It was also revealed that Johnny wanted to reason with Ricky for the tournament event, but Ricky didn't listen to him and drove him out of his house.
The team decided to investigate the diner again and found out from Monica that she was angry at the victim for bringing Roger and his gang with him. Even Ricky followed him and would go to the diner. Roger and Ricky never paid their bill which made Monica furious at the victim. Then they went back to the primary crime scene and with the help of a bunch of clues, they successfully incriminated Ricky Tipton for the murder of Johnny Howard.
Ricky told them that he should be congratulated for killing Johnny as he was a cheater. Susan asked him how did Johnny cheat and Ricky replied that in order to win the match without any problem, Johnny put drugs in Ricky's bag and he told the authority that Ricky won the previous matches by cheating. After that the authority didn't even think twice and disqualified Ricky and declared Johnny as the champion of the tournament when Ricky deserved to win the trophy as a better player than Johnny. That event made Ricky angry enough to kill Johnny, even he followed Johnny everywhere. Johnny became depressed after that event and wanted to atone for that. So, he asked Ricky to meet him at the supermarket even after getting driven by Ricky from his house, giving him an ultimate chance to kill Johnny. Ricky was so angry that he stabbed Johnny, even after he apologized. For the first-degree murder, Judge Powell sentenced him to 30 years in prison with a chance for parole in 20 years.
After arresting Ricky, Casey asked them to find out why Johnny cheated in the final match. They came to know that Roger and his gang was behind all those amd that they made a deal only to get the money from the victim. After fining Roger and giving the news to Casey, they investigated the diner as people were complaining that Monica was serving unhygienic food. But after a quick analysis, it was revealed the food was fully safe and hygienic. Then Monica offered them a special burger as a thanks.
Summery
Victim
- Johnny Howard (Found stabbed in his back)
Murder Weapon
- Pocket Knife
Killer
- Ricky Tipton
Suspects
")
")
")
")
")
Killer's Profile
- The killer is right-handed.
- The killer drinks Bloody Mary.
- The killer uses Friendnet.
- The killer's weighs 147 lbs.
- The killer's blood type is B+.

Crime Scenes
| Supermarket | Drink Corner | Supermarket Bonus |
| Abandoned House | Lawm | Abandoned House Bonus |
| Diner | Kitchen | Diner Bonus |
Steps
Chapter 1
- Investigate Supermarket. (Clues: Victim's Body, Sports Bag, Cigarette Pack, Stained Can; Victim identified: Johnny Howard; New Suspect: Monica Storm)
- Autopsy Victim's Body. (18:00:00; Attribute: The killer is right-handed)
- Ask Monica about the victim.
- Examine Sports Bag. (Result: Torn Photo)
- Restore Torn Photo. (Result: Victim's Photo; New Clue: Unknown Woman)
- Identify Unknown Woman. (Result: Casey Walter; New Suspect: Casey Walter)
- Ask Casey about her relationships with the victim. (Prerequisite: Unknown Woman identified)
- Examine Stained Can. (Result: Dark Red Substance)
- Analyze Dark Red Substance. (06:00:00; Attribute: The killer drinks Bloody Mary)
- Examine Cigarette Pack. (Result: Message to Victim; New Crime Scene Unlocked: Abandoned House)
- Investigate Abandoned House. (Clues: Drug Baggie, Golf Club; Prerequisite: Cigarette Pack examined)
- Examine Drug Baggie. (Result: Supplier Code; New Suspect: Richard Stamford)
- Ask Richard Stamford if he supplied drugs to the victim. (Prerequisite: Drug Baggie examined)
- Examine Golf Club. (Result: Sweat)
- Analyze Sweat. (06:00:00; New Suspect: Ricky Tipton)
- Ask Ricky Tipton about the victim. Prerequisite: Sweat analyzed)
- Go to Chapter 2. (1 star)
Chapter 2
- Investigate Diner. (Clues: Wallet, Smartphone; Available after unlocking Chapter 2)
- Examine Wallet. (Result: Bank account check)
- Examine Check. (Result: Bank account number)
- Analyze Bank account number. (06:00:00; Result: Roger's account [A huge amount of money got transferred from Johnny's account to his account]; New Suspect: Roger Spitfire)
- Ask Roger why the victim gave him money. (Profile updated: Roger is right-handed)
- Unlock Smartphone. (Result: Unlocked Smartphone)
- Analyze Smartphone. (06:00:00; Result: Victim's phone [His Friendnet account was found full of death threats]; Attribute: The killer uses Friendnet)
- Investigate Lawn. (Clues: Richard's Diary, Locked Laptop; Prerequisite: All tasks before must be done first)
- Examine Richard's Diary. (Result: Information about Richard's drug supplying occupation)
- Ask Richard how the victim owed him $15000. (Profile updated: Richard drinks Bloody Mary)
- Unlock Locked Laptop. (Result: Victim's Laptop)
- Analyze Laptop. (03:00:00; Result: The victim's chatting list; Profiles updated: Casey uses Friendnet, Ricky uses Friendnet)
- Ask Ricky why the victim asked him to meet. (Profile updated: Ricky is right-handed)
- Go to Chapter 3. (No stars)
Chapter 3
- Investigate Kitchen. (Clues: Bloody Mary Glass, Broken Signboard; Available after unlocking Chapter 3)
- Examine Bloody Mary Glass. (Result: Bloody Mary Sample)
- Analyze Bloody Mary Sample. (06:00:00; Result: DNA Sample of Casey; Profile updated: Casey drinks Bloody Mary)
- Ask Casey what she was doing at the kitchen. (Profiles updated: Casey is right-handed, Monica drinks Bloody Mary)
- Restore Broken Signboard. (Result: Signboard [The victim was banned from the diner])
- Ask Monica why she banned the victim from her diner. (Profile updated: Monica is right-handed & uses Friendnet)
- Ask Roger why he used to go to diner with the victim. (Profile updated: Ricky drinks Bloody Mary; Prerequisite: Monica interrogated)
- Investigate Drink Corner. (Clues: Bloody Mary Can, Trash Can; Prerequisite: All tasks before must be done first)
- Examine Bloody Mary Can. (Result: Note)
- Analyze Can. (09:00:00; Attribute: The killer's weighs 147 lbs)
- Examine Trash Can. (Result: Pocket Knife)
- Examine Pocket Knife. (Result: Blood)
- Analyze Blood. (15:00:00; Attribute: The killer's blood type is B+; Murder Weapon registered: Pocket Knife)
- Take care of the killer now!
- Go to Chaos in the Streets (2/7). (No stars)
Chaos in the Streets (2/7)
- Ask Casey what happened. (Available after unlocking Chaos in the Streets)
- Investigate Supermarket. (Clues: Instruction Paper)
- Examine Instruction Paper. (Result: Instruction [Someone asked Johnny to meet at the abandoned house])
- Investigate Abandoned House. (Result: Drawer)
- Examine Drawer. (Result: Note [Asking the victim to give money for helping him to win the championship])
- Quiz Roger why he forced the victim to cheat. (Reward: 20000 Coins)
- Inform Casey about the facts. (Reward: Gold Chain [MALE], Pearl Necklace [FEMALE])
- Ask Monica why people are complaining about her diner. (Prerequisite: All tasks before must be done first)
- Investigate Kitchen. (Clues: Cooked Food; Prerequisite: Monica interrogated)
- Analyze Food Sample. (06:00:00; Result: Info [Foods are hygienic & safe])
- Inform Monica that there is nothing to worry about. (Reward: Burger)
- Move on to a new crime! (No stars)